This tutorial is created for test and experimentation, use at your own risk, always backup your data before creating experimental OS's.
Here are the steps to get OS X High Sierra running on a HP 800 G1, this process should work for SFF and tower models of the same type.
Bios version L01 v02.71 05/09/2017
ME Firmware V 9.0.31.1487
If your system does not have these versions you results may vary.
Bios settings
Apply bios defaults
Storage - Storage options = AHCI
This tutorial is based on the method of installing OS X onto the hard drive from a real Mac running OS X 10.13, other methods will require additional steps and research
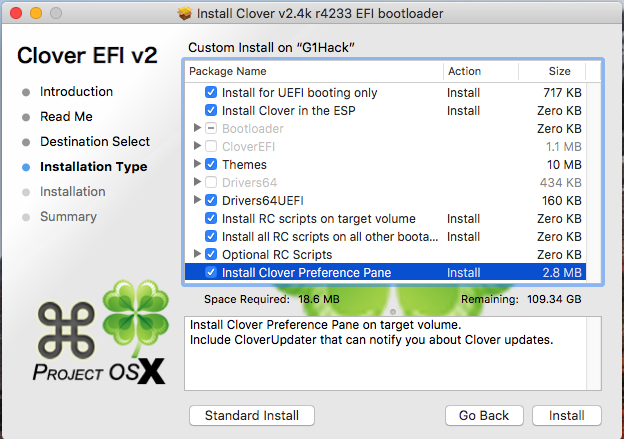
After you have installed OS X on the drive that your are going to put into the HP 800 G1, you will need to install Clover Boot loader version 4233 or higher. Make sure to install Clover on the disk that will be going into the HP.
Note: all these steps needs to be done on the real Mac, DO NOT install clover on your real Mac, go slow and verify before you proceed.
Select the options as pictured.
You will need to obtain the following files (google it and download it)
Clover_v2.4k_r4233
Clover Configurator 4.53
HWMonitor 6.25-333
AppleHDADisabler.kext 1.0.1
CodecCommander.kext 2.6.3
FakeSMC_ACPISensors.kext 6.25-333
FakeSMC_CPUSensors.kext 6.25-333
FakeSMC_GPUSensors.kext 6.25-333
FakeSMC_LPCSensors.kext 6.25-333
FakeSMC.kext 6.25-333
IntelMausiEthernet.kext 2.3.0d0
Lilu.kext 1.1.7
USBInjectAll.kext 0.6.2
VoodooHDA.kext 2.8.9
You will need to add the following Kexts to /EFI/Clover/kexts
The below are the Clover options you will need to apply using Clover Configurator
<?xml version="1.0" encoding="UTF-8"?>
<!DOCTYPE plist PUBLIC "-//Apple//DTD PLIST 1.0//EN" "http://www.apple.com/DTDs/PropertyList-1.0.dtd">
<plist version="1.0">
<dict>
<key>ACPI</key>
<dict>
<key>DSDT</key>
<dict>
<key>Debug</key>
<false/>
<key>DropOEM_DSM</key>
<false/>
<key>Fixes</key>
<dict>
<key>AddPNLF_1000000</key>
<true/>
<key>FIX_ACST_4000000</key>
<true/>
<key>FIX_ADP1_800000</key>
<true/>
<key>FIX_INTELGFX_100000</key>
<true/>
<key>FIX_RTC_20000</key>
<true/>
<key>FIX_S3D_2000000</key>
<true/>
<key>FIX_TMR_40000</key>
<true/>
<key>FIX_WAK_200000</key>
<true/>
<key>FixRegions_10000000</key>
<true/>
</dict>
<key>Name</key>
<string>DSDT.aml</string>
<key>ReuseFFFF</key>
<false/>
</dict>
<key>DropTables</key>
<array>
<dict>
<key>Signature</key>
<string>DMAR</string>
</dict>
<dict>
<key>Signature</key>
<string>SSDT</string>
<key>TableId</key>
<string>CpuPm</string>
</dict>
<dict>
<key>Signature</key>
<string>SSDT</string>
<key>TableId</key>
<string>Cpu0Ist</string>
</dict>
</array>
<key>HaltEnabler</key>
<true/>
<key>SSDT</key>
<dict>
<key>DropOem</key>
<false/>
<key>Generate</key>
<dict>
<key>CStates</key>
<true/>
<key>PStates</key>
<true/>
</dict>
</dict>
</dict>
<key>Boot</key>
<dict>
<key>Arguments</key>
<string>npci=0x2000 kext-dev-mode=1 rootless=0</string>
<key>Debug</key>
<false/>
<key>DefaultLoader</key>
<string>boot.efi</string>
<key>DefaultVolume</key>
<string>G1Hack</string>
<key>Legacy</key>
<string>PBR</string>
<key>Secure</key>
<false/>
<key>Timeout</key>
<integer>5</integer>
<key>XMPDetection</key>
<false/>
</dict>
<key>CPU</key>
<dict>
<key>C2</key>
<true/>
<key>C4</key>
<true/>
<key>C6</key>
<true/>
<key>UseARTFrequency</key>
<false/>
</dict>
<key>Devices</key>
<dict>
<key>Audio</key>
<dict>
<key>ResetHDA</key>
<true/>
</dict>
<key>FakeID</key>
<dict>
<key>IntelGFX</key>
<string>0x04128086</string>
</dict>
<key>USB</key>
<dict>
<key>AddClockID</key>
<true/>
<key>FixOwnership</key>
<true/>
<key>Inject</key>
<true/>
</dict>
</dict>
<key>GUI</key>
<dict>
<key>Mouse</key>
<dict>
<key>DoubleClick</key>
<integer>500</integer>
<key>Enabled</key>
<false/>
<key>Mirror</key>
<false/>
<key>Speed</key>
<integer>8</integer>
</dict>
<key>ScreenResolution</key>
<string>1280x1024</string>
<key>Theme</key>
<string>Classic Mac OS</string>
</dict>
<key>Graphics</key>
<dict>
<key>Inject</key>
<dict>
<key>ATI</key>
<false/>
<key>Intel</key>
<true/>
<key>NVidia</key>
<false/>
</dict>
<key>LoadVBios</key>
<true/>
<key>NvidiaSingle</key>
<false/>
<key>ig-platform-id</key>
<string>0x0D220003</string>
</dict>
<key>KernelAndKextPatches</key>
<dict>
<key>AppleIntelCPUPM</key>
<true/>
<key>AppleRTC</key>
<true/>
<key>Debug</key>
<false/>
<key>KernelCpu</key>
<false/>
<key>KernelHaswellE</key>
<false/>
<key>KernelLapic</key>
<false/>
<key>KernelPm</key>
<true/>
<key>KextsToPatch</key>
<array>
<dict>
<key>Comment</key>
<string>Trim Enabler</string>
<key>Disabled</key>
<false/>
<key>Find</key>
<data>
AEFQUExFIFNTRAA=
</data>
<key>Name</key>
<string>IOAHCIBlockStorage</string>
<key>Replace</key>
<data>
AAAAAAAAAAAAAAA=
</data>
</dict>
<dict>
<key>Comment</key>
<string>Raise USB Port Limit</string>
<key>Disabled</key>
<false/>
<key>Find</key>
<data>
g32MEA==
</data>
<key>MatchOS</key>
<string>10.13.x</string>
<key>Name</key>
<string>AppleUSBXHCIPCI</string>
<key>Replace</key>
<data>
g32MGw==
</data>
</dict>
</array>
</dict>
<key>RtVariables</key>
<dict>
<key>BooterConfig</key>
<string>0x28</string>
<key>CsrActiveConfig</key>
<string>0x67</string>
<key>MLB</key>
<string>C02032109R5DC771H</string>
<key>ROM</key>
<string>UseMacAddr0</string>
</dict>
<key>SMBIOS</key>
<dict>
<key>BiosReleaseDate</key>
<string>09/03/2013</string>
<key>BiosVendor</key>
<string>Apple Inc.</string>
<key>BiosVersion</key>
<string>IM141.88Z.0118.B00.1309031248</string>
<key>Board-ID</key>
<string>Mac-031B6874CF7F642A</string>
<key>BoardManufacturer</key>
<string>Apple Inc.</string>
<key>BoardType</key>
<integer>10</integer>
<key>ChassisAssetTag</key>
<string>iMac-Aluminum</string>
<key>ChassisManufacturer</key>
<string>Apple Inc.</string>
<key>ChassisType</key>
<string>13</string>
<key>Family</key>
<string>iMac</string>
<key>Manufacturer</key>
<string>Apple Inc.</string>
<key>ProductName</key>
<string>iMac14,1</string>
<key>SerialNumber</key>
<string>GETYOUROWN</string>
<key>Trust</key>
<false/>
<key>Version</key>
<string>1.0</string>
</dict>
<key>SystemParameters</key>
<dict>
<key>InjectKexts</key>
<string>Detect</string>
<key>InjectSystemID</key>
<true/>
</dict>
</dict>
</plist>


